We have boiled down our top 11 stained glass soldering tips to help you master the art and learn how to solder glass art.
This is one of the most crucial steps in the process and can truly make a difference in your stained glass projects.
Iron Solder
So why do we use solder? Solder is a combination of tin and lead used to create a strong bond between other metals. Solder doesn't stick to the glass pieces, so we apply copper foil tape to the edges, which is where you get the copper foil method. We melt the solder over the copper foil that holds the pieces together.
These tips are going to cover the copper foil method, but you will also utilize solder with the lead came method as well.
1. Safety: One of the most important aspect of soldering any stained glass project is to take the proper measures to safeguard your health. Soldering involves working with potentially hazardous materials like lead, flux and harmful fumes. By observing specific safety precautions and using informed common sense, working in stained glass can be a safe and enjoyable past time. Ventilation, wearing glasses, and securing the glass pieces are a few additional tips.
2. Choosing your soldering iron: There is a lot to consider when you choose an iron for stained glass. The handle should be heat resistant and comfortable for you to hold. You may be holding it for several hours at a time, so consider the weight and balance of the iron. Wattage is an important aspect of the iron you choose. It must be able to continuously generate enough heat to melt all of the types of solder you plan to work with. We recommend an iron that is at least 60 watts with a way to control the temperature.
3. Iron and tips maintenance: Investing in a soldering iron is a big step in whether you take this art seriously or not. A well maintained soldering iron and tips perform better and make the job of soldering much easier. Consider buying a soldering iron stand to keep your iron working at its best.
4. Do I need flux? Flux is a chemical compound that is used to promote the bonding of metals by removing the oxide residue simultaneously with the soldering process. Because of oxidation and other matters, it's important to use flux in the bonding process as each mix of metals being used has a specific flux.
5. Before you begin: Make sure the foil is seated properly over the glass, trim all overlaps, put together all tools needed for the project, and secure your glass pieces. Not to mention review the safety measures.
6. Make sure you clean the surface you are about to solder. Steel wool is the best way to clean the surface of copper foil
7. Getting started: Flux all intersections first, then use a small amount of solder and flatten with the iron tip. Next fill in the gaps between the glass pieces until the solder is level with the surface of the glass. Then, coat the surface with a thin layer of solder. Finally, use your flux. We like to start at the top and work down as it tends to turn out better.
8. Running the solder bead: The best way we have found to run the bead is to hold the iron like a cutting knife and utilize your writing hand. If you run into a problem, just let the solder cool, then re-solder the joint applying more solder.
9. Fixing imperfections: If you apply too little add more. If you apply too much, then clean your iron tip and move the flat part across the seam. This will pull the excess solder easily. The key when soldering is to work slowly, but not too slowly causing heat fractures and melted solder.
10. Finishing: We use a finishing wax to make sure the solder is looking its best. Carnuba wax is one example that will work.
11. Practice: Utilizing stained glass soldering ebooks, courses, and videos and try different techniques. What works for one artist may not work as well for another. Find what fits your style.
Artist, this is just a start, but these are our top stained glass soldering tips. Yes, these get more in depth, but provide an overlay to the process and steps.
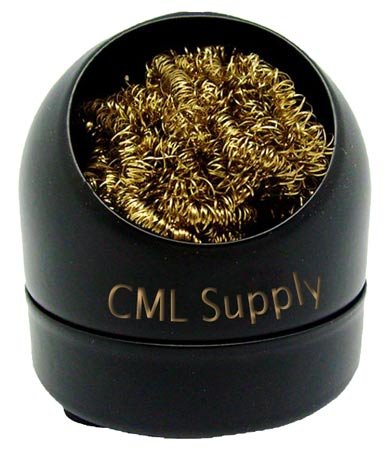
Special Price!!! Soldering Iron Tip Cleaning Wire Sponge With Brass Ball
Click for larger image and other views

Soldering Iron Tip Cleaning Wire Sponge With Brass Ball Feature
- "shell" design keeps the solder from splattering
- Will not reduce the tip temperature
- A great alternative to the conventional damp sponge
- May be used as a portable tool holder and cleaner
- Compatible with Hakko Tip cleaners and brass replacement ball
Soldering Iron Tip Cleaning Wire Sponge With Brass Ball Overview
Cleans your soldering iron tips without water! Made from coils of brass, which is softer than the tip plating yet harder than the oxidation that forms on the tip. To clean the tip, simply plunge (stab) the iron tip into the coils. The ideal alternative to a wet sponge.
Compare to .47 for the "Brand Name" ball of brass!
* "shell" design keeps the solder from splattering* Will not reduce the tip temperature* A great alternative to the conventional damp sponge* May be used as a portable tool holder and cleaner* Compatible with Hakko 599B-02 Tip cleaners and brass replacement ballSAVE NOW on the special offers below!
Available In Stock. |
| This Soldering Iron Tip Cleaning Wire Sponge With Brass Ball ships for FREE with Super Saver Shipping. |
Price : Click to Check Update Prices Please. |
