Installation of PEX plumbing systems should be carried out strictly according to the project in hand. Normally, PEX plumbing systems are installed by trained professionals with technical knowledge of the system. But if you want to install PEX plumbing systems on your own then there are certain things you would have to keep in mind before you set out to do the actual task of installing a full-fledged PEX plumbing system.
What is PEX?
Iron Solder
Firstly, you have to know what PEX is. For the uninitiated, PEX is cross-linked polyethylene. These are often used for radiant heating purposes, but now these are also used extensively for hot and cold plumbing installations. PEX tubing and plumbing systems are easy to work with since they are quite flexible. This is one advantage PEX systems have over normal copper systems. Owing to its design, PEX is also more durable under temperature extremes and chemical attack. It is also highly resistant to creep deformation.
Steps to be followed while installing PEX:
Below is a simple step by step guideline on how to install such a plumbing system. Just follow these steps carefully and you will be able to install a PEX plumbing system at your home without the help of any technician. It will also save you some extra bucks.
Things required for installing a PEX Plumbing system:
PEX piping and fittings
PEX crimps
PEX manifold with ball valves
Nailing plates
PEX stub outs Tools:
Hammer
Soldering machine
PEX cutting equipments
Straps
Hangars
Paddle bit
Crimp gauge
Right-angle drill
Step-1:
Slowly start drilling after you have placed the bit up to the stud. Increase your drilling speed as you move forward. While drilling, just make sure that each hole is at the same level so that the pipe can run parallel to the floor. Also drill through the sill plate and sub-floor for individual water lines.
Step-2:
After you are done with drilling, insert and run the water lines through those holes. In most cases, the water lines come through the floor. But in certain other cases, the lines may come through the wall studs. In those cases, make sure you drill the holes right at the center so that while hanging the board, the screw and nails of the board do not harm or damage the pipes in any way.
Step-3:
Pull the lines upwards through the holes on the sub-floor. Also, run the other end to the area where water will be coming into the home. Leave pout some extra pipes on both the ends. Now use the clamps and secure the lines to the joists. Make sure, you keep the hot and cold lines as far apart as possible to minimize heat transfer.
Step-4:
Now do the rough stub-outs for the sinks. You can use a right-angle drill or a paddle bit to carry out this task. Just make sure to cut-off the rough fitting cap and install finish valves after you put up the walls.
Step-5:
It is now time to install the crimps. For the perfect crimp set up, make sure the PEX is straight when you cut it. Now slide a crimp ring onto and then insert the pipe in the crimp fitting. Use slip-joint pliers to slide the crimp ring up. Do not do it with your fingers, or else you might hurt yourself while tightening the crimp ring. Make sure the crimp ring is 1/8 inches or 1/4 inches from the end of the pipe.
Step-6:
Now rough the lines to the fixtures. Do not solder around the PEX tubing or you might end up damaging the pipes. You should use a fitting called PEX 90. After it has cooled from soldering, you can fit it onto the PEX water line.
Step-7:
Position the valve in a way where they will face down when they are hung in their places. Solder them to their positions.
Step-8:
You can now pull up the water lines from the crawlspace and connect them to the manifold. Screw the top brackets to stud keeping them at eye level. Also install the bottom brackets to the manifold.
Step-9:
Now mark all the holes with a nail and start drilling them. Just make sure you do not damage the manifold while you are doing your drilling work. Put the manifold on the ground after you have finished you drilling work.
Step-10:
Now you can attach the PEX ball valves to the manifold. Screw every valve onto its port properly. Get one of the lines and pull it up to the valve to make sure it fits properly. This type of arrangement will mean that each fixture will have its own shut-off valve.
Step-11:
After you are done with fitting the ball valves, you can now pull up the PEX tubing from the crawlspace and attach them at their places.
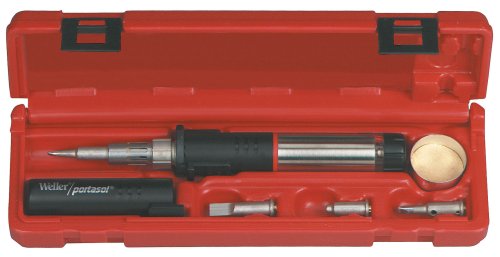
Black Friday Weller PSI100K Super-Pro Self-Igniting Cordless Butane Soldering Iron Kit 2011 Deals
Nov 26, 2011 07:10:34
Click for larger image and other views

Black Friday Weller PSI100K Super-Pro Self-Igniting Cordless Butane Soldering Iron Kit Feature
- Operates up to 2 hours per refill of standard butane fuel.
- Kit contains PSI100 iron, sponge, stand and extra tips-Packed in a plastic case.
- Features Auto Switch safety shut off
- Butane fuel level is visible through a window on the body of the tool
- Built in butane filter
Black Friday Weller PSI100K Super-Pro Self-Igniting Cordless Butane Soldering Iron Kit Overview
Super Pro Portasol Kit- The patented soldering tool has a catalytic converter that provides a powerful, yet safe, flameless combustion. Easily interchangeable screw-in tips and accessories. Safety cut-off switch when cap is replaced. Refills with standard butane lighter fuel. Fast, flint-sparked ignition in high-strength plastic cap. (Butane Not Supplied). (Malaysia)SAVE NOW on Black Friday offers below!
Available In Stock. |
| This Black Friday Weller PSI100K Super-Pro Self-Igniting Cordless Butane Soldering Iron Kit ships for FREE with Super Saver Shipping. |
Price : Click to Check Update Prices Please. |
